How to create your first Google Ad
By Team EtchRock in Adwords & SEO,EtchRock

- 5 ways to boost your post-event engagement - June 22, 2017
- 7 ways to grow your email database - June 15, 2017
- 5 ways to increase slowing ticket sales - May 29, 2017
Now that we know the basics of Adwords and how to get started with your Google Adwords account, we can look at how to actually create your first ad and measure their success. Getting your first Adwords campaign up and running is easy, optimising it is the hard part.
To get started with your first campaign, head on over to Google Adwords and select create a new campaign.
Name and select your campaign – Get started by naming your campaign and selecting its type. To start, select ‘Search Network Only’ under type. Then, under the ‘Networks’ section, de-select ‘Include Search Partners’. Don’t worry, these can all be changed later.
Location – If you have a local event, you may want to try and set your location to just your local area to start off with. Bear in mind that people from outside your event’s location will also want to take part.
Start off with your local county or state, you can always scale up later.
Bid strategy – This is where you need to think about your daily budgets and how much your keywords are worth. If you want to see how much your keywords are worth, check out our blog on choosing keywords.
Although there are plenty of automated options, start off by setting your bid strategy to manual so you can get in the habit of optimising your own campaigns. This gives you far more control over your budget and you always have the option to change it back at a later date.
Enter your daily budget into the space provided. Remember, this is your budget per day. It can, and most likely will all be used each day, so start off small.
The default bid is a little more complicated, this is your maximum cost-per-click for ads in a certain ad group. Google give a great breakdown understanding bidding basics and choosing a budget that works for you. To start off, you need to think about how much an ad click is worth to you. If you’re unsure, set it at £1 to start off with and you can amend later when you get a better feel for your keywords.
Ad extensions – These allow you to add extra layers to your ad such as a call button or the location of your business. For now, don’t use any ad extensions, you can add them later if they are relevant.
Create Ad groups
When you’ve filled in everything, select ‘next’ to move onto creating Ad Groups. We go into greater depth about Ad groups in our blog learning the basics of Adwords.
If you haven’t already started to think about Ad groups, you can use this page to get some ideas. First, put the URL of your landing page in the space provided. If you have one with optimised keywords for certain Ad groups, use that. If not, don’t worry, just put the destination you currently have.
Use a head keyword in the box and Adwords will give you selections to choose from, or you can use your own. When you are ready, you can then continue to create your first ad.
Create Ad
So now you know about how your account is structured, it’s time to look at the layout of the actual ad itself. The structure of a Google Ad is very simple, yet people make huge mistakes, which can cost them big in the long run. With so few text characters available, it’s vital that you get it right
This is a screenshot of Google’s Ad creator in Adwords. It gives you a better idea of what components an Ad is comprised of. It’s important that you understand the different parts as they play a huge role in getting your business conversions.
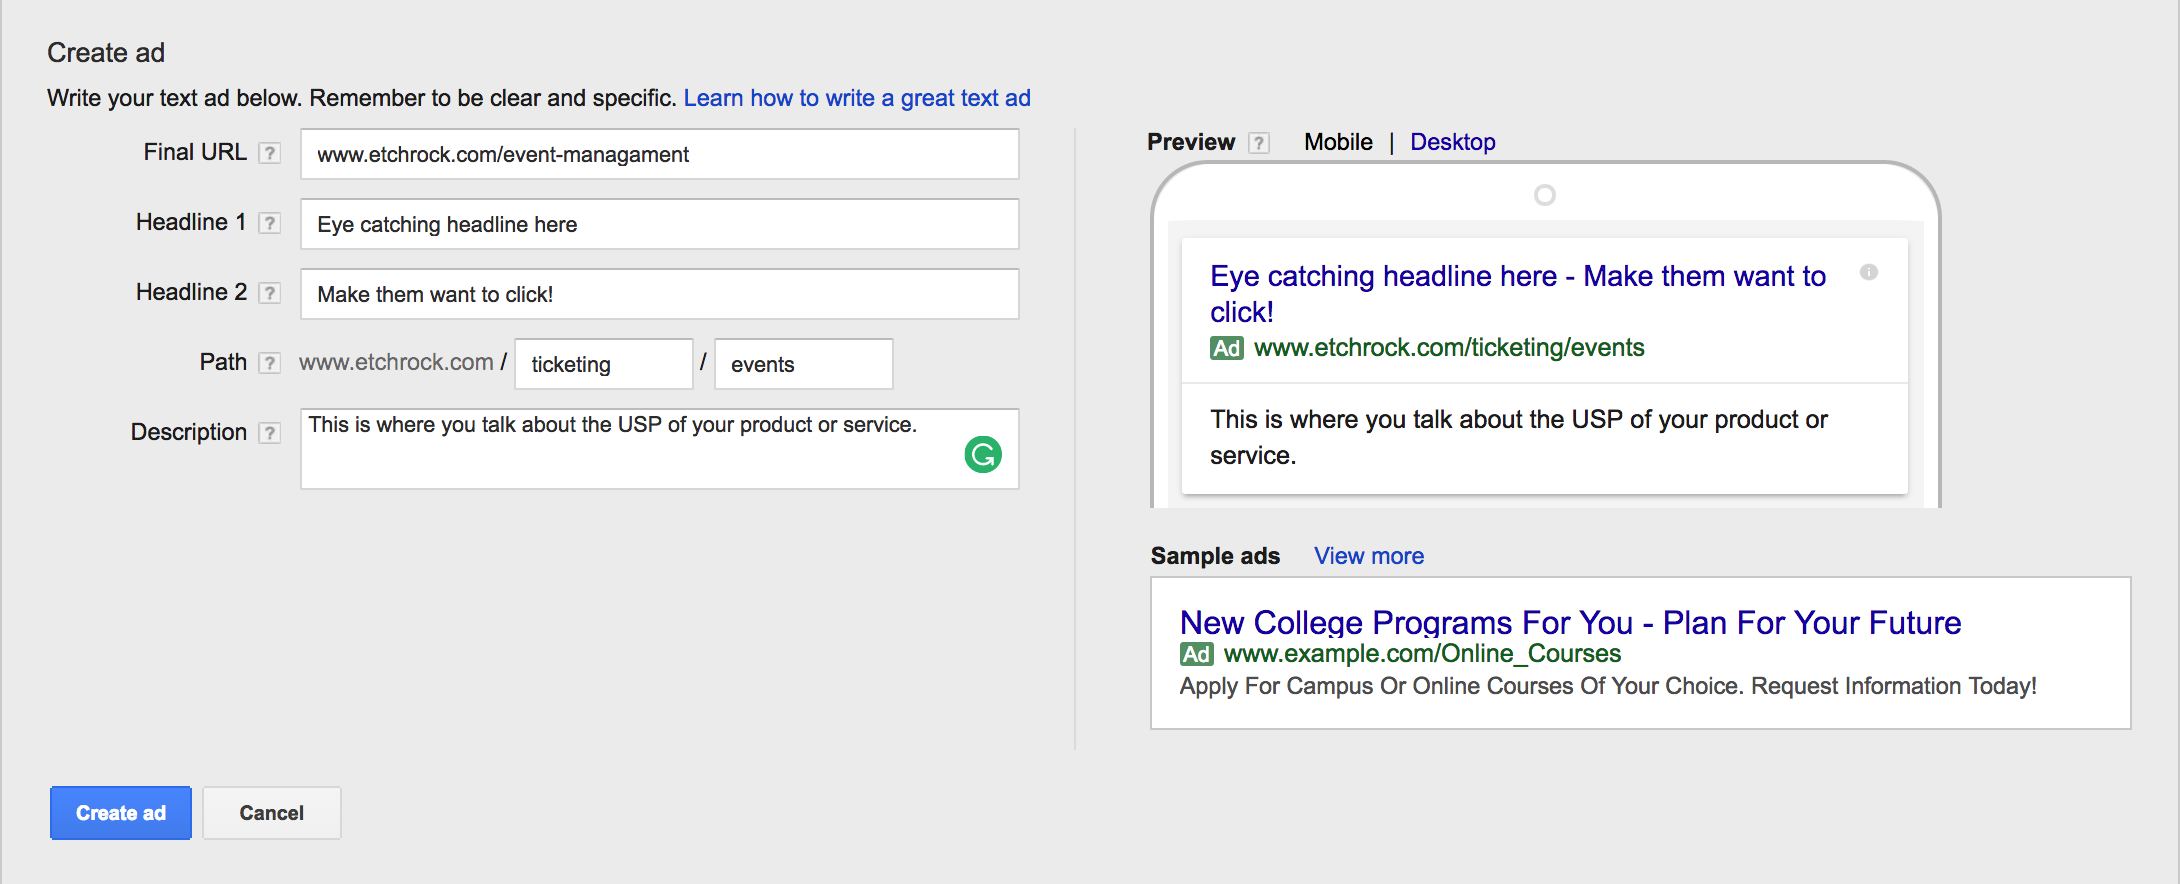
Final URL: This is simply the destination URL that your Ad takes a visitor to when clicked upon.
Headline 1: This is the most important part of your Ad. A good headline will get you clicks. A bad one won’t. Make it eye catching to draw attention to your Ad. Once you get started with Adwords, you will be experimenting A LOT with different headlines.
Headline 2: This is an extension of the first headline. Same rules apply as above for the first headline. Experiment to get the best results.
Path: This is an optional layer that you can add to your URL. As you can see from the screenshot, I added ‘ticketing’ & ‘events’ into the path and it shows up in the green URL to the right. The path field gives potential customers an idea of where they will end up on your site once they have clicked your ad.
Description: This is where you can expand your offering. Talk here about the USP’s of your offer and give people a reason to click. Again, lots of experimenting is needed to find the right combination.


