How to make your own Snapchat Geofilter for your event
By Team EtchRock in EtchRock,Social Media

- 5 ways to boost your post-event engagement - June 22, 2017
- 7 ways to grow your email database - June 15, 2017
- 5 ways to increase slowing ticket sales - May 29, 2017
Make your own Snapchat geofilter for your race
With Snapchat now having around 300 million monthly active users, event organisers are flocking to the platform to capitalise on the fastest growing social network. Just for some context, Snapchat had 33 million monthly users only three years ago.
A large amount of users isn’t the only reason marketers are targeting Snapchat, it’s also down to the time spent on the app. With over 10 billion videos watched every day on Snapchat, there is plenty of content for users to indulge in. It’s not all about sharing photos or ‘snaps’. Here’s how daily usage compares to Facebook’s apps (including Messenger and Instagram), YouTube and Twitter:
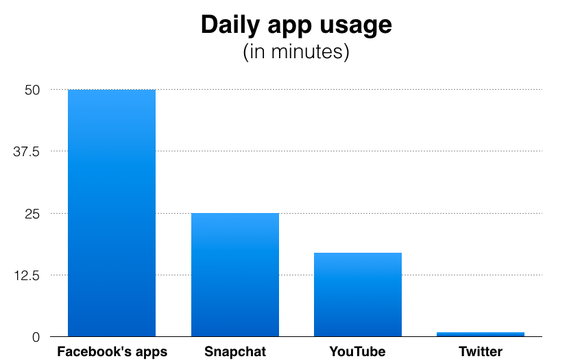
Whilst Facebook may dominate the market, Snapchat isn’t too far behind. The app still easily outranks its much more established competitors, Twitter & YouTube.
But as an event organiser, I’m sure you’re saying, “How does the apply to me and in what ways can I use Snapchat for my race?” The answer is Geofilters.
But what is a SnapChat geofilter? Geofilters are graphical overlays available to Snapchat users in specific areas. This feature allows people within your geographical area to apply your own branded Snapchat filter to their photos or ‘snaps’.
What value does this give you?
First off, brand recognition. Think about it for a second. You now have the ability to create a filter for your race with your logo on it. This is then automatically available to everyone who is at your event and using Snapchat.
When a Snapchat user sends a snap with your branded filter on having a great time at your event, their friends will see it. Then their extended networks can also see if they share it on their timeline too. Simple peer-to-peer marketing principles. A Snapchat geofilter is an awesome way to get the word out about your brand.
This is especially true among millennials where nearly three-quarters of Snapchat’s 300 million users are aged 18-30. If you’re looking to bring in a younger demographic, this could be a great place to start.
At $5 per 20,000 square feet for your own branded Snapchat geofilter, it’s a real bargain compared to similar platforms where you pay for impressions
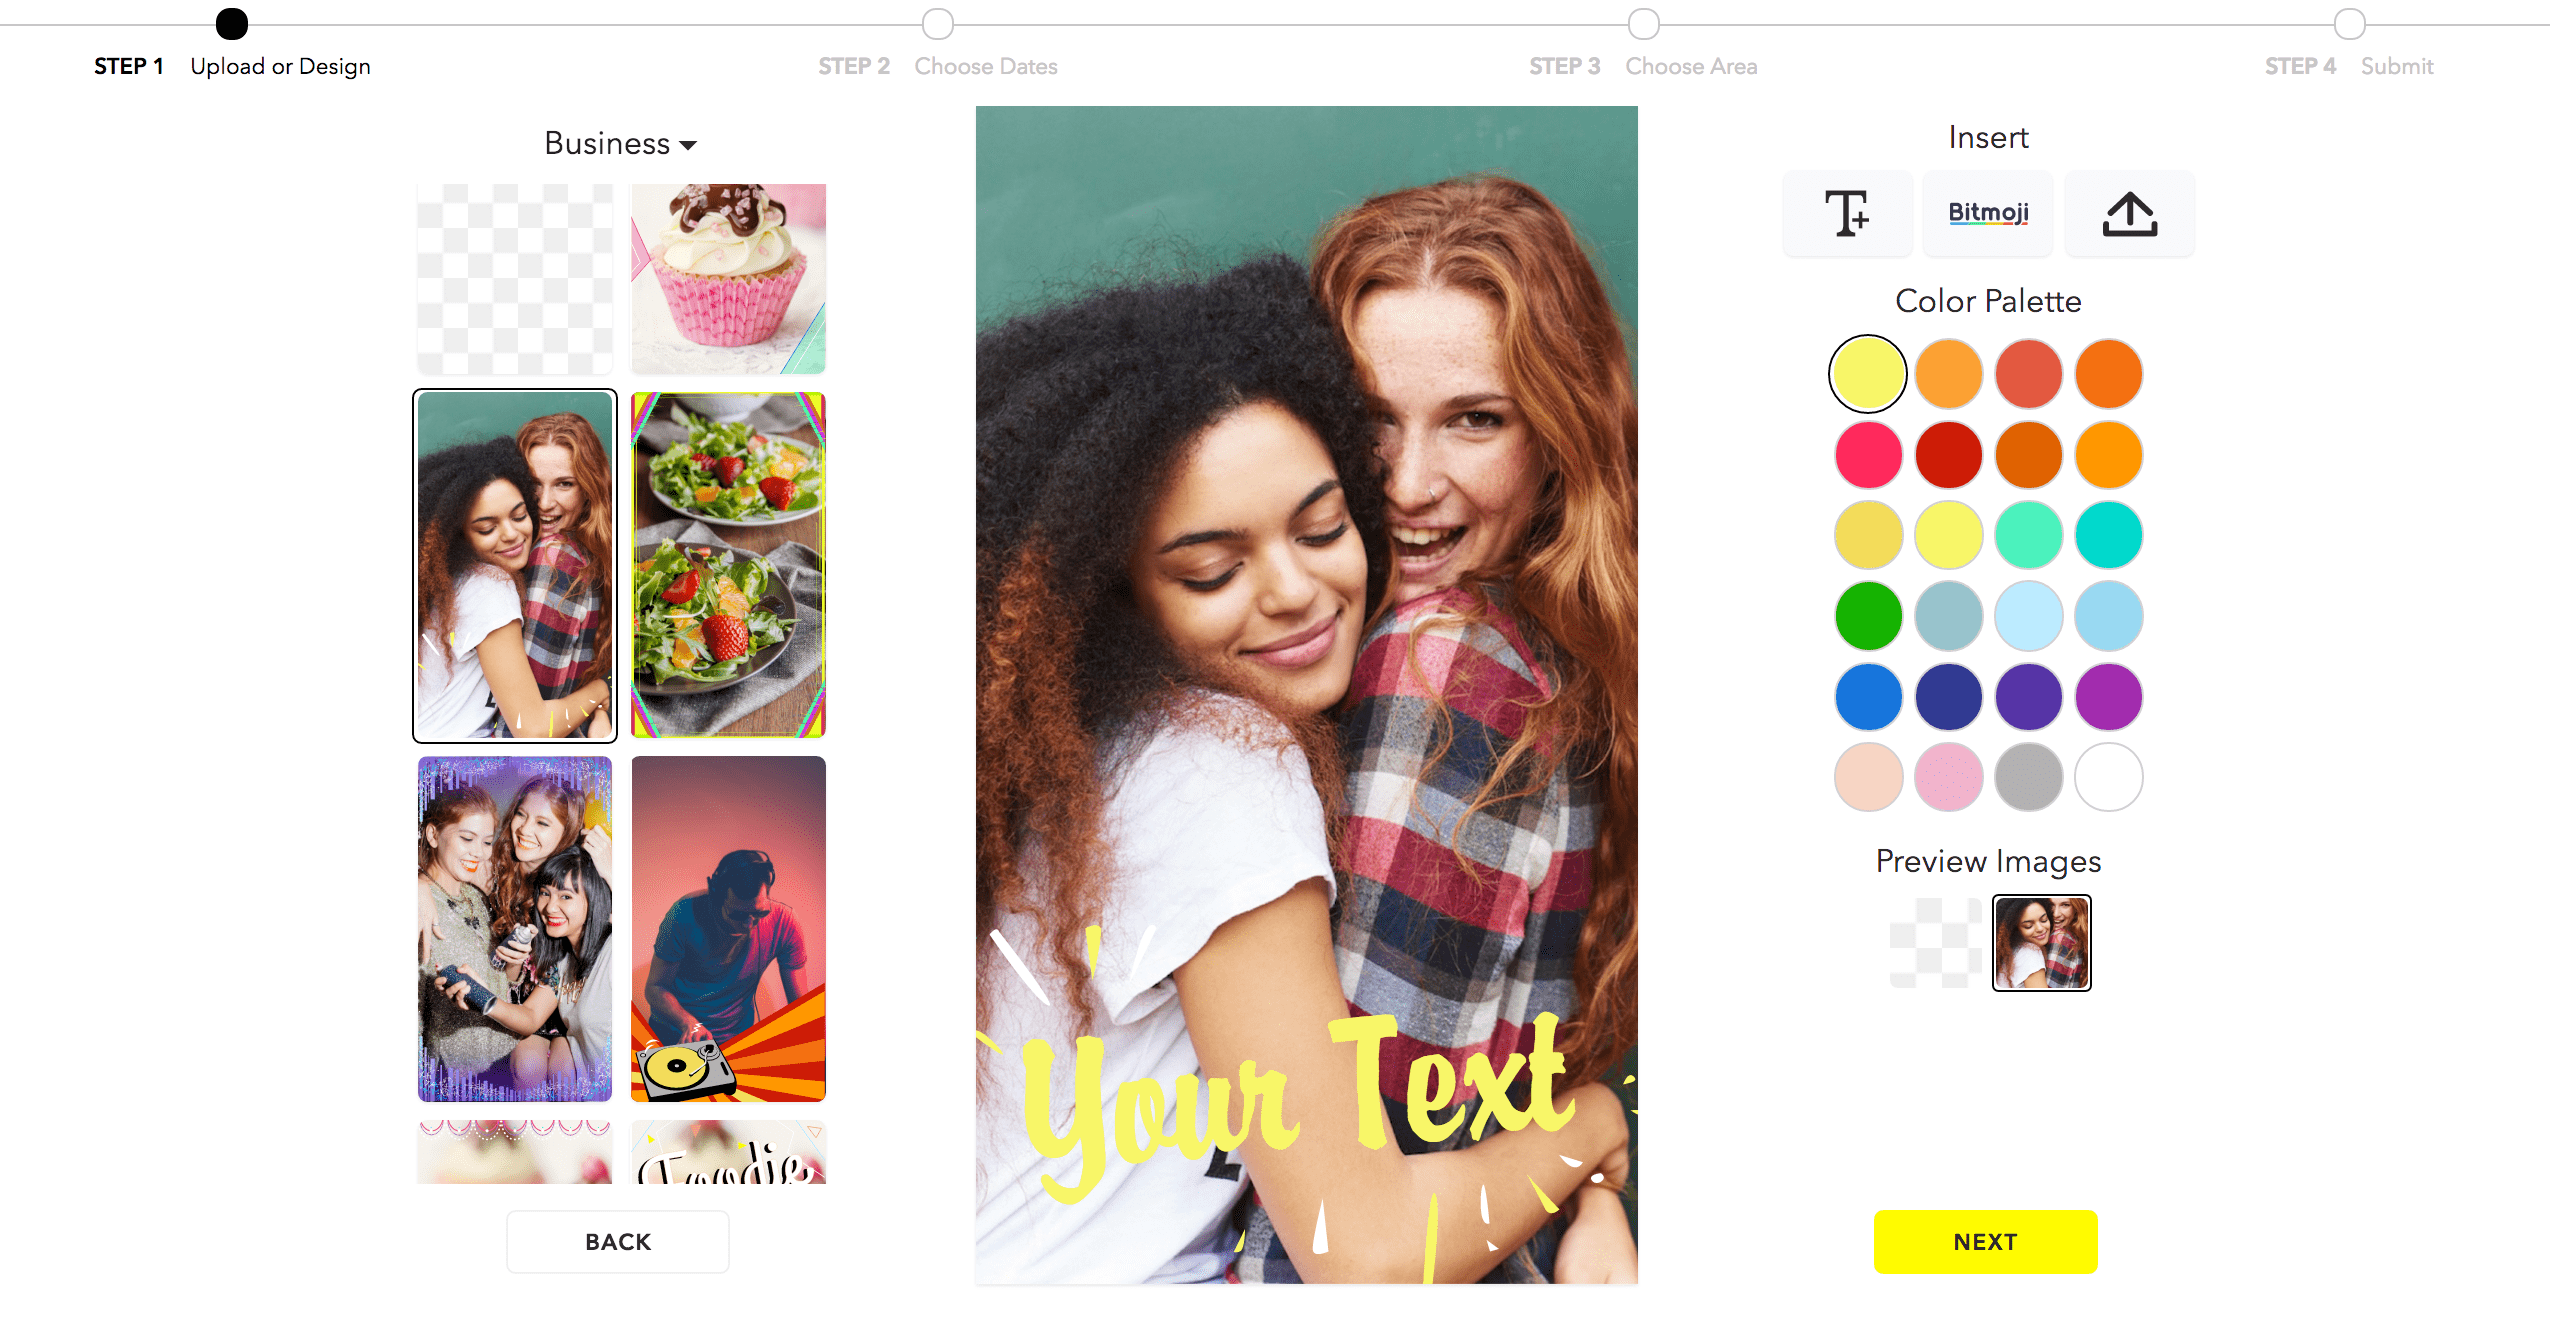
How to create your own Snapchat Geofilter
First off, you’ll want to head over to the Snapchat website where you can create geofilters. You want to select the ‘On-demand’ option for your business.
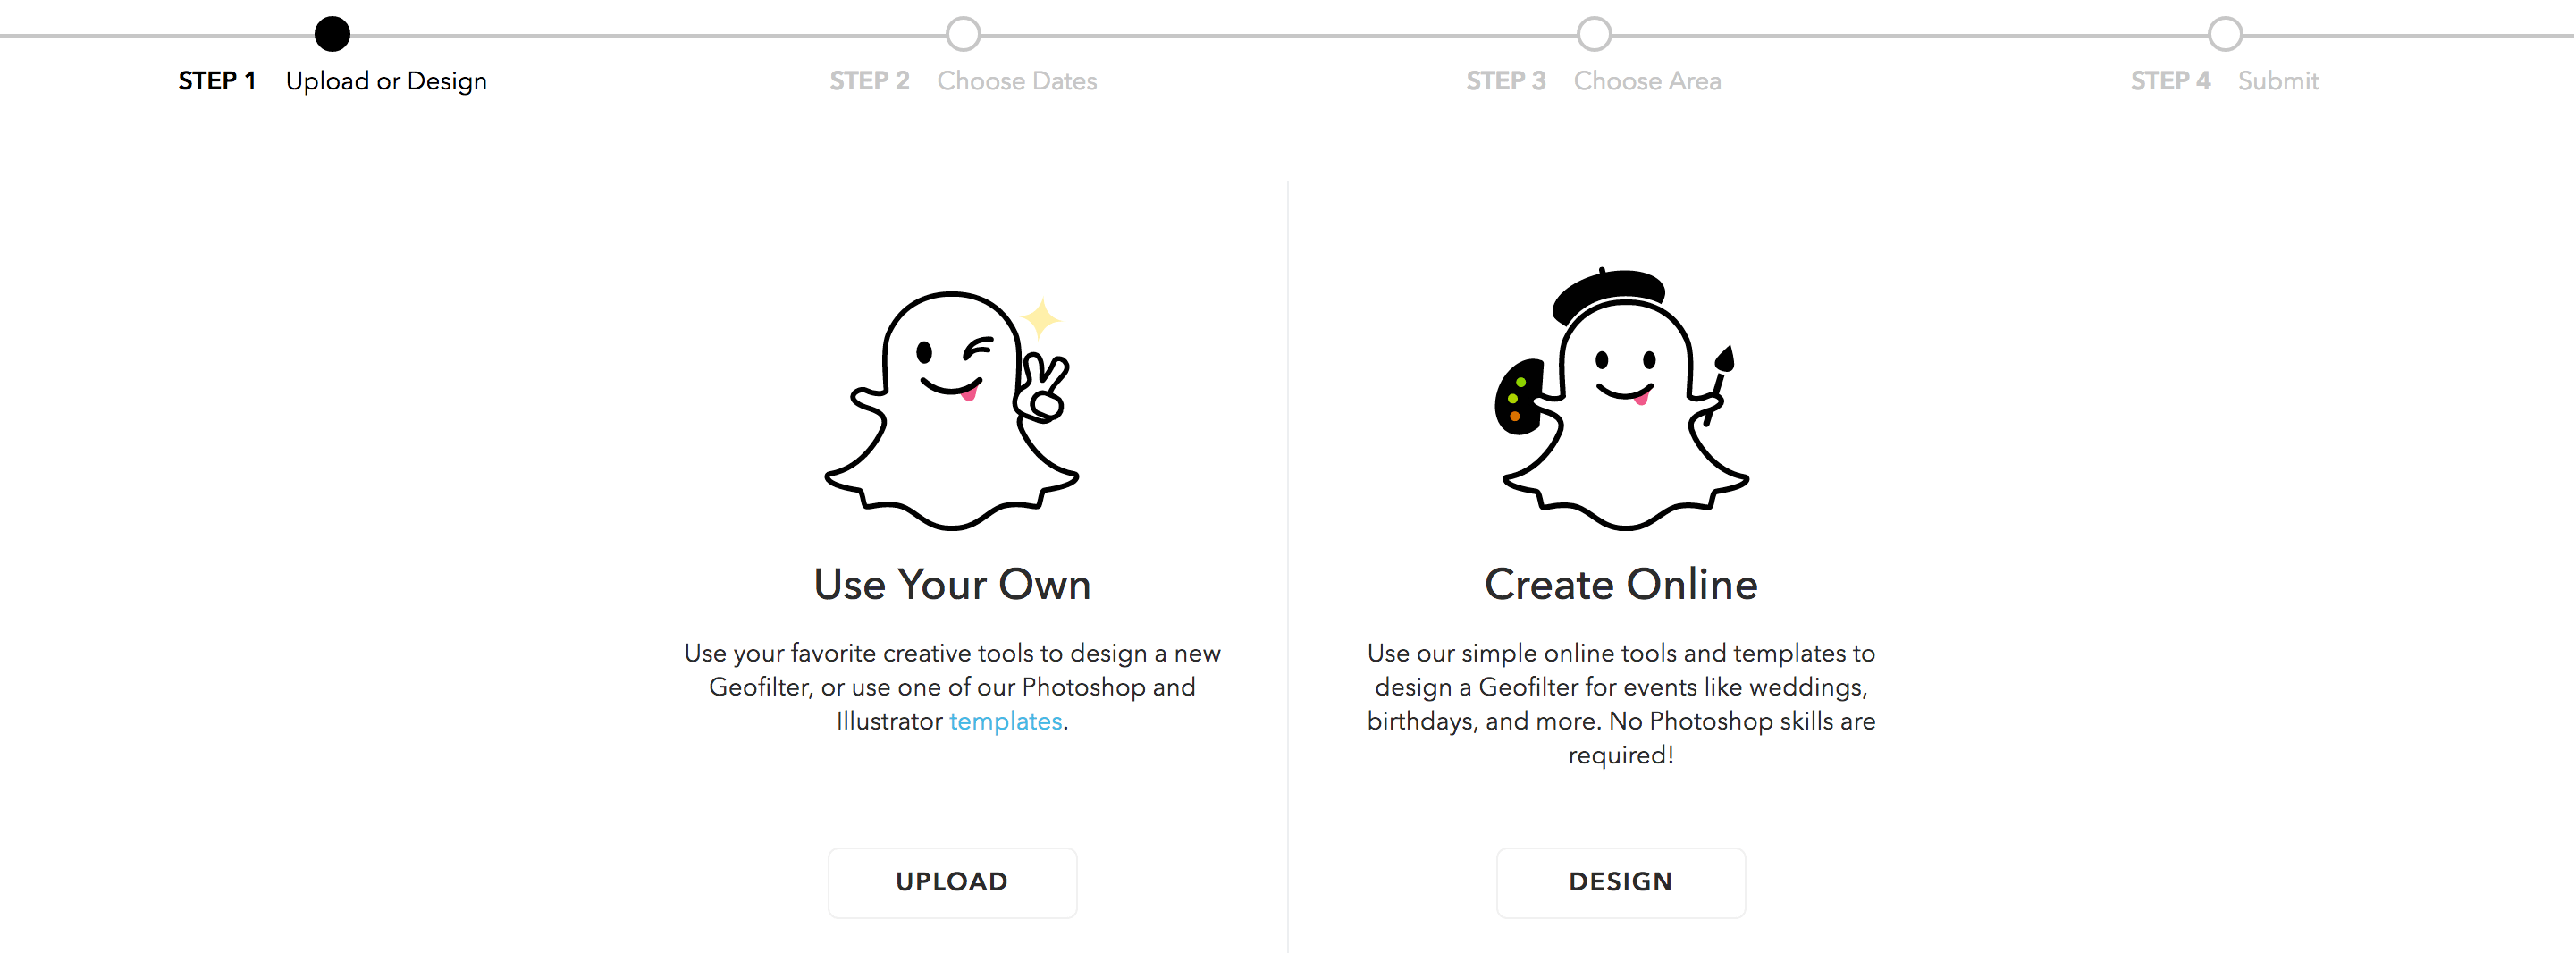
You now have the option to create your own using your favourite design tools or you can use Snapchat’s pre-set templates to work from.
You’ll most likely want to go with the former option. This means that you will be able to upload your own logo, branding and fonts. To make your own custom geofilter, you’ll want to work to these guidelines:
– Files should be 1080px wide by 1920px high.
– Files should be under 300KB in size and saved as a .PNG file.
– The image should have a transparent background.
– Your file should be under 300kb.
– You need to follow the Snapchat submission guidelines otherwise, your filter might get rejected.
If you don’t have access to Photoshop, one of our favourite platforms to create graphics would be Canva which is more than up to the task. If Canva isn’t for you, check out our blog on 5 different design platforms that you need to try.
You can use the purchase tool preview page to see how your Geofilter will look on different devices.
Don’t have time to create your own? Use Snapchat’s builder to create yours quickly.
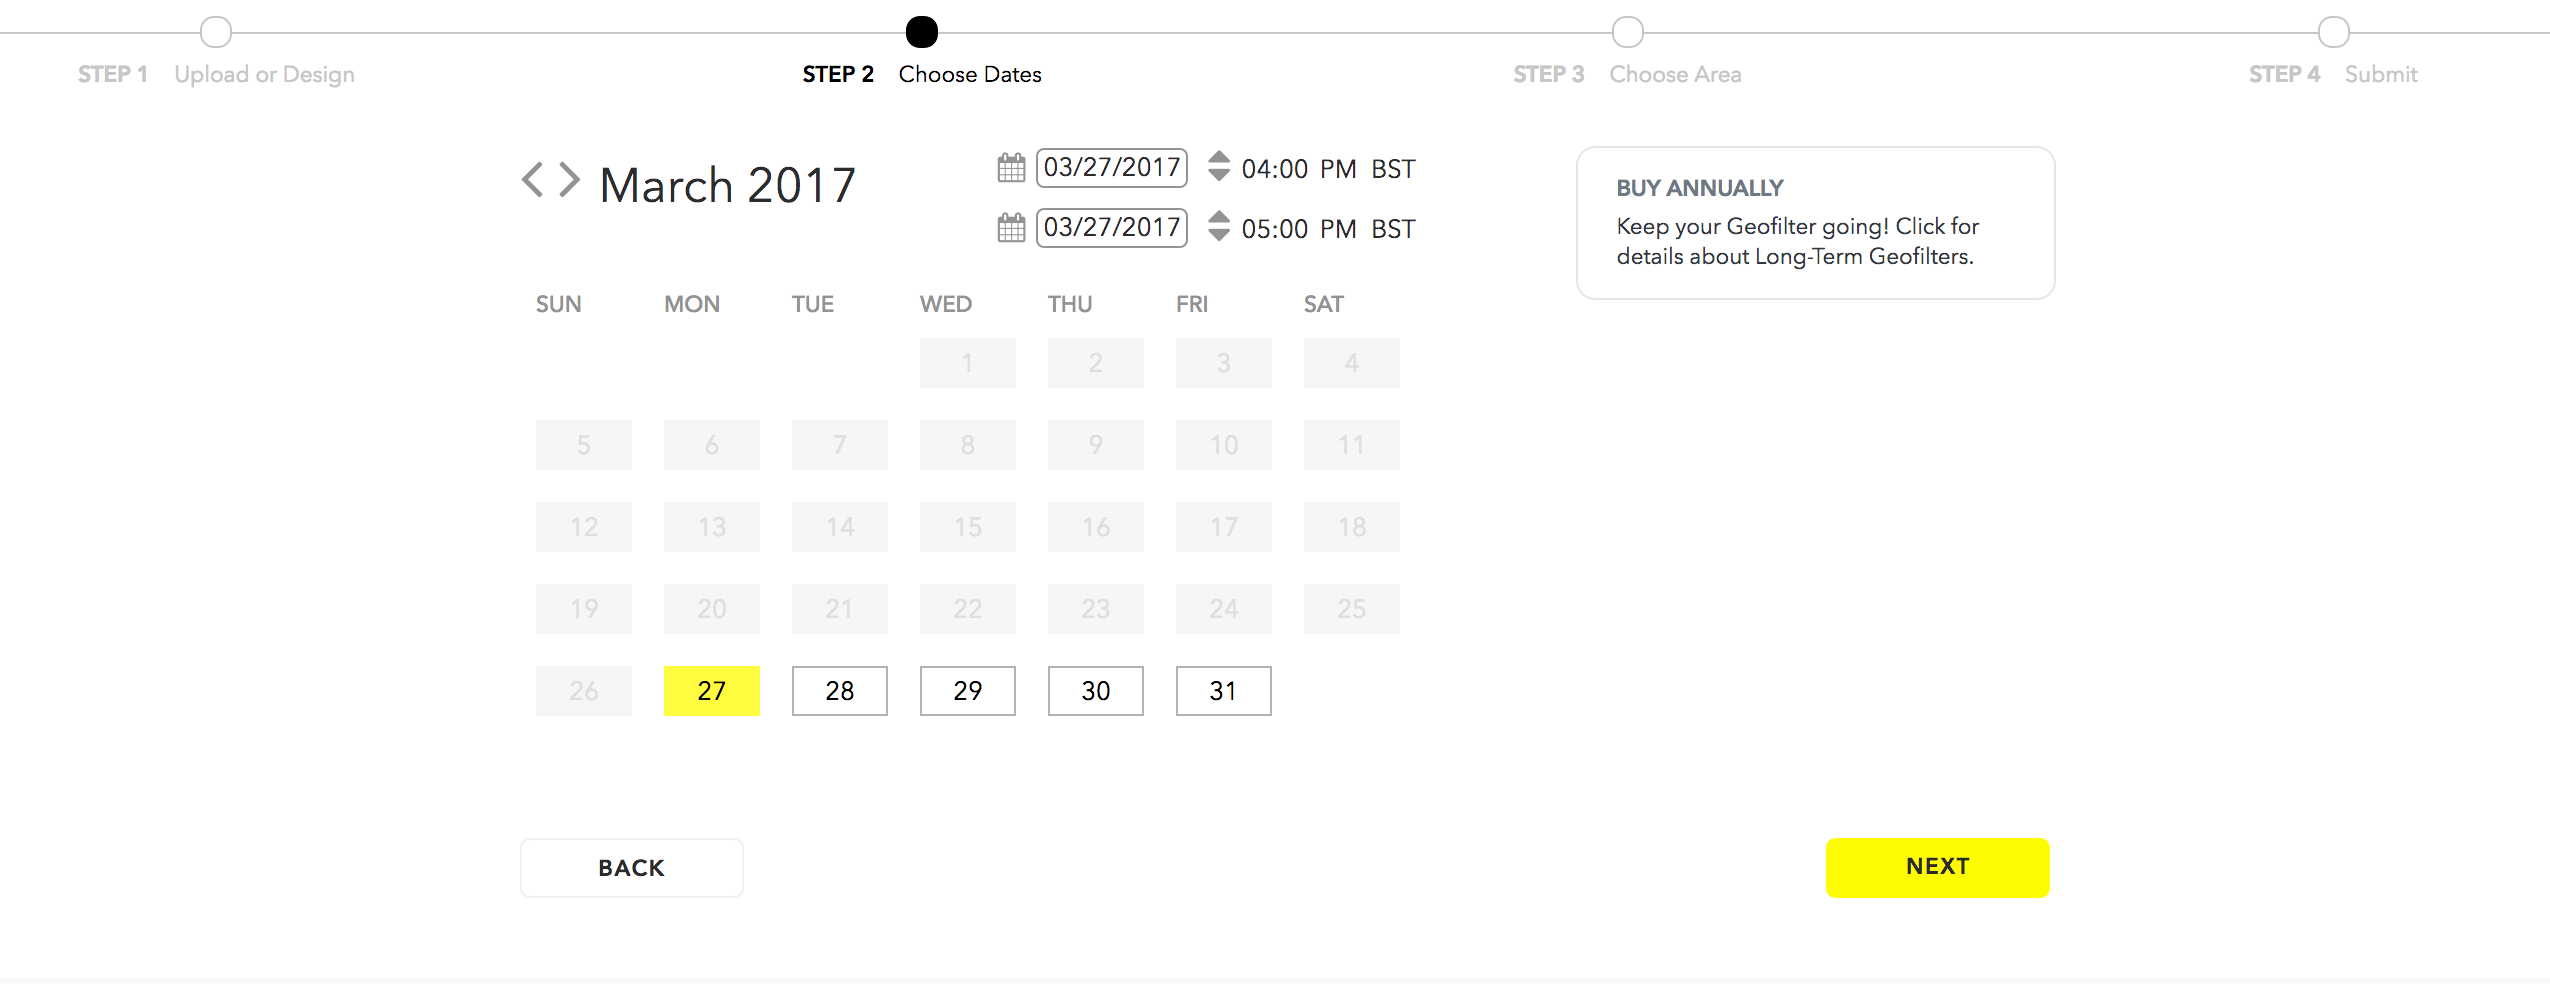
After you have decided on your geofilter, you then have to select the dates that you want it to be available. You can run your Snapchat geofilter for up to one month. Just be aware, the longer you have it running for, the more expensive it will be.
As your events are location based, it would best advised to do the dates in which your race is happening.
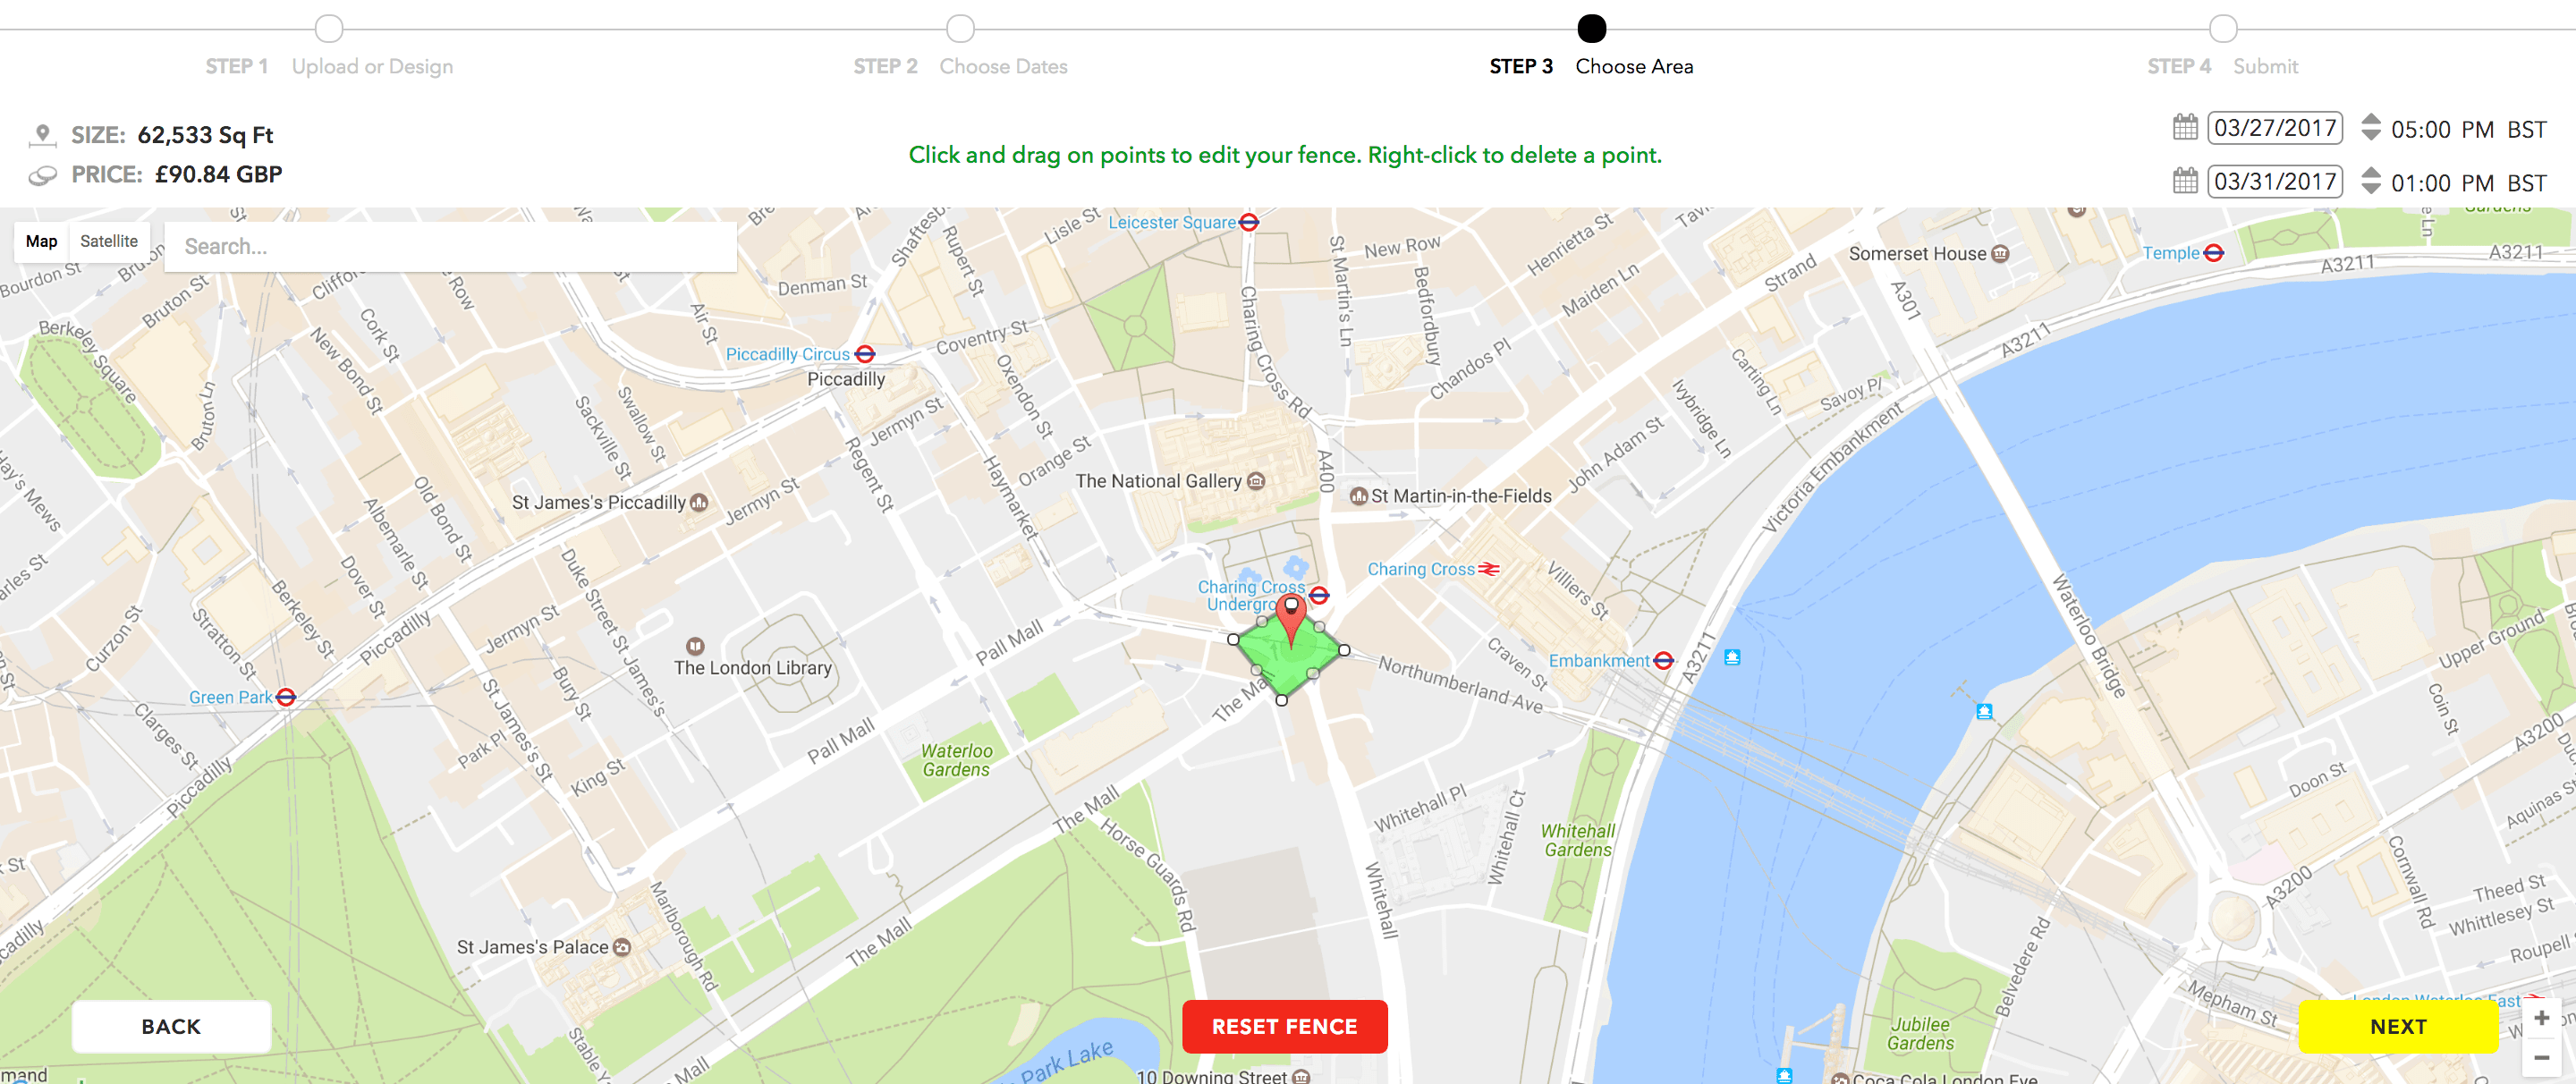
Once your date has been selected, you then need to draw your area. Snapchat has integrated with Google Maps so it’s extremely simple to select your event’s location.
You simply draw a ‘fence’ in where your geofilter will be available to users. The size in square feet and cost are displayed in the upper left corner, so make sure you adjust accordingly. Try and give yourself a bit of leeway when defining your perimeter. It’s always best to be on the safe side and map out a little extra space as GPS technology can be unreliable sometimes, as I’m sure you all know!
If you are a regular event holder, there is an option for long-term use in which you can save a bit of money. Although, this option is typically reserved for venues in which people visit daily.
Once you have done that, you are ready to process your payment and have your filter be sent to the Snapchat team ready for review! Always be sure to do all this well in advance just in case there is a hold up on their end.
And that’s it, you’ve created your first Snapchat Geofilter! Easy right? If this is your first attempt, make sure there are signposts around your event to promote the use of your new geofilter. Also, use your other social networks to prompt users to use Snapchat at your event.
We would love to hear about your success stories of Snapchat geofilters at your race!


